• Welcome to RedcatRampageForum! Are you a Redcat fan? If so you're in luck as you've have arrived to the biggest and best RedcatRampage RC community.

    Come join our community and ask your questions, show off your Recat RCs and share your experience!

My rebuild of the problem areas... with pics!

cordy

Senior Member
Messages
2,032
Location
near chicago
Ok neutech is a seperate brand. I have a neutech sand storm,i was just looking at the manual on line and it looked like the same case as my xb. all these things are made in china,the insides look very simillar to me .Maybe my eyes are going bad.I would assume that if the differential is basicly the same it should fit. Ok I will make you an offer if you order that plastic differential housing from neuteck since your xb is all apart, if it don't work I will buy the case off of you cuz I am going to buy myself a tb3 for xmas.
 
Last edited by a moderator:

nitrohobbiest

Member
Messages
75
Location
Upstate NY
That's a tricky offer you made there. Problem is, I may have to mod the part or my chassis in the attempt to make it work. I may make it less usable to you when I'm done. But I should be able to tell easy enough if it will work. Question is, do I want to wait for another part to arrive? I'll have to think about it. My new Redcat housing is already on my bench. Hmmm.
 

big JC

Member
Messages
41
Location
Portland Oregon
In addition to possibly replacing the dif bearings with better ones and finding a solution to the flex, would building the weak area up on the dif case with something like JB weld be effective? This is my plan when I get one unless someone talks me out of it. I have used JB weld in other (automotive) applications and the stuff is uber tuff
 

nitrohobbiest

Member
Messages
75
Location
Upstate NY
JB Weld is great but I don't think its gonna work. Its got the strength but its ability to adhere to plastic that may move is poor. I've used metal weld putty on a plastic tranny just to bulk it up and the tranny still failed (Losi LST2 tranny case). I've also tried to repair a crack in a plastic chassis by filling in all the deep ribs of the cast areas and that failed as well. I guess the key would be to find a method of making the plastic surface very coarse so it has something to bite to. I thought I had done a good job of that but it didn't work. Not sure if JB sticks better than the putty but I still have my doubts.

You'll see how I'm getting mine done. I got a good start on it today. First step was to cut, drill and tap a large aluminum plate to beef up the back half of the chassis. I have that 80% done. I have a few more holes to drill and tap, then the final fit a finish. Part 2 is started as well. I plan to submerge the week bearing area in a block of aluminum that will be braced directly to the chassis and four points on the diff housing. I'm getting excited just thinking about the end result so I can't wait to finish up and post more pics.
 

big JC

Member
Messages
41
Location
Portland Oregon
I have had good luck with JB weld adhering to plastic. In any event, as you and others have stated this would do nothing for the flex issue. Look forward to pics and details on your fix nitrohobbiest!
 

xbeNewb

Member
Messages
90
Location
Langley BC Canada
I purchased the rear skid plate for my XBE from T-Bone racing. I don't think it'll do much to help the rear chassis flex on the XB / XT but if somebody makes a similar one out of aluminum, it could help.
 

nitrohobbiest

Member
Messages
75
Location
Upstate NY
Here is my progress so far...

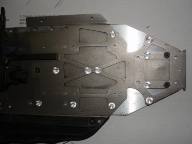
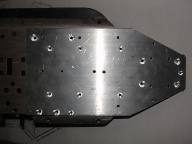
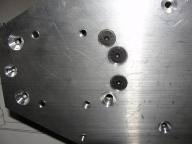
First up is the plate I milled up to create the back bone to the weak chassis. I believe this is the sole reason for all the diff breakages. It will be attached with 5mmX10mm flat head hardened screws, along with the ones that normally pass through the chassis. I will also use locktite between the two surfaces which should help reduce any further movement. It still needs some finish work to make it look a little better but this will give you the idea.

006.jpg

007.jpg

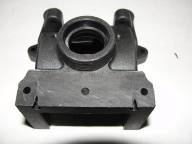
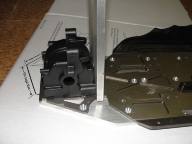
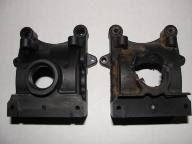
This next picture shows the new diff case with the plastic milled away from the pinion bearing area leaving a 1 inch circle behind.

003.jpg

More to follow in next post...
 

nitrohobbiest

Member
Messages
75
Location
Upstate NY
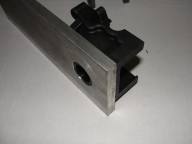
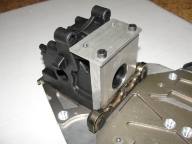
The reason for this is to make room for my next mod. I am adding a 3/8 inch block of aluminum to the diff housing to insure that it can't be forced to break. I started the job by drilling a 1 inch hole through the plate. The rest will be done soon.

004.jpg

005.jpg

The plate will be cut to fit, drilled and tapped, and bolted directly to the chassis as the diff housing is. It will also be bolted into the housing using longer screws running through the lower suspension arm holder and be braced back to the two screw bosses where the top plate goes as you see in the picture. This will add some serious beef to the entire area. This next picture gives you an idea of placement.

008.jpg

That's what I've got so far. In case you were wondering, I used a sliding miter saw, table saw, and a drill press to do all of the work so far. I plan to have it buttoned up by the weekend with any luck. This has been an evening project after the kids go to bed. If I had the time, I would be plowing straight through this project 'till it was done but that's not how real life works. ;)
 
G

Guest

Guest
Look'n good. Your chassis plate should really stop flex. Have you thought of welding the aluminum together?
 

cordy

Senior Member
Messages
2,032
Location
near chicago
Looks good so far.Nice looking plate.What is the thickness of the plate and where did you get it? Looks like a lot of work on the diff. housing.
 

nitrohobbiest

Member
Messages
75
Location
Upstate NY
Thanks! Welding: I thought about it but there's a couple reasons I skipped it. First off there is a chance that the chassis would not be a good, weldable material. Its hard to tell until you try and that could turn into a mess. Secondly, there is a chance the chassis could warp while welding it which would be even worse. Drilling it guarantees it won't be wrong.

As for the plate, its 1/4 inch thick, 6061 which was about $10 for all the pieces I got for this project. I got it at Metal Supermarket which is local to me in Albany NY. I wanted to get 7075 but that would have been about $70+ and a special order which this truck is not worth that. But the 6061 in this thickness, is more that adequate.

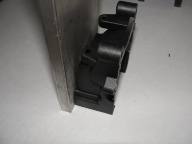
The diff housing wasn't too hard. A few passes through the table saw took off the bulk of the plastic back to the depth I needed. I did a practice cut on the old housing first as you can see here:

002.jpg

Then a few slices with my knife and finished it up by putting a square metal grinding bit that I use in my Dremel, into my drill press and just slid the housing around on the table and ground off the remaining areas. This kept the everything square and fairly true so the plate has the best chance of supporting the bearing area evenly. I confess that I used a step drill to get to the 1 inch hole I needed so I drilled it from both sides but then had to use that same grinding bit to finish out the center of the hole. Because I had the step drill, the added work saved me about $15 for the cost of a regular 1 inch drill bit that I may never use again. Each step on the drill bit goes in an 1/8th inch so it would have finished off a 1/4 inch plate had I gone that route.

Hopefully I'm not typing too much info but hopefully it might help someone else.
 
Last edited by a moderator:

cordy

Senior Member
Messages
2,032
Location
near chicago
Thank you for the info as some of us are not machinests by any means,and besides thier may be a market for the plate.
 

big JC

Member
Messages
41
Location
Portland Oregon
Never to much info nitrohobbiest! Thanks for the pictures and write up. Keep us posted on the finish work and how it handles future abuse. I thought about welding on a plate as well but my understanding is it would have to be heat treated afterword (assuming it's aluminum I don't have an xt in my hands yet) to maintain strength? and that's complicated. Another thought I had would be to roll two or three beads in that section of the chassis, not sure if that would work or interfere with the mounting holes ,etc. but could add considerable strength
 
Last edited by a moderator:

nitrohobbiest

Member
Messages
75
Location
Upstate NY
Welding would be preferred IF you could be sure it works out. No screw will out-hold a strong bead of weld. But I find it too risky. Between the several screw holes I added, the existing screws that pass through the chassis to hold the engine, brackets and such, and then topping that with Locktite between the two plates and on the mounting screws, I just don't see it going anywhere.

I got the diff braces finished up as far as cutting and drilling goes. I am extremely happy with the results. I would be highly surprised if the case fails due to a jump, roll, or cartwheel. Bearing failure is a different story but I'm gonna start with freshies anyhow. Here is a shot of the brace all sized up, drilled and partially mounted to the chassis:

0012.jpg

Here is a picture of the bottom side where I added the additional 2 screws which hold the brace directly to the chassis and also the diff via everything combined. You'll see 3 screws in the pic. The 2 perpendicular to the center line of the chassis are the two new mounting holes. I went with more 5mm screws being that there was so much bulk to drill into.

0022.jpg

At this point, the next pics you'll see will be the truck going back together and all parts finished off. Not sure what I will do to the items yet. My meticulous side wants to go all out for showroom quality while my practical side says I've done the needed work and I'm going to scuff the hell out of it soon enough so why spend the time. I'll probably meet in the middle. I guess it depends on when my next available run time could be as to how much more time I spend fiddling with it.
 

cordy

Senior Member
Messages
2,032
Location
near chicago
Great so far. After your done could you be gracious enough to weigh the xb dry.
 

big JC

Member
Messages
41
Location
Portland Oregon
Looks pretty stout nitrohobbiest! Wondering if anybody has ever tired some type of slip yoke instead of the solid dogbone, or if there was one on the market that would fit/work?
 
G

Guest

Guest
Looking tough. I can't wait until you put it through the ringer to see how it holds up. I would be extremely surprised if you can break it.
 

nitrohobbiest

Member
Messages
75
Location
Upstate NY
cordy said:
Great so far. After your done could you be gracious enough to weigh the xb dry.
I can do that. Its an XT also, if it matters. I know I added a bit more weight but it'll be worth it to have it hold up. But I have to say, thanks to this forum, I had a way better plan of attack on how to fix this thing. I've read about the chassis flex, etc. and with that knowledge I confirmed that it was an issue. I may not have beefed up the chassis if no one pointed it out. So thanks to all for the input.

If this ends up working out, this may be a nice upgrade for "7075" to put on the market. Basically call it a rigid aluminum skid plate. But the best scenario would just be a complete chassis made differently, maybe thicker with less cutouts.
 
G

Guest

Guest
If this ends up working out, this may be a nice upgrade for "7075" to put on the market. Basically call it a rigid aluminum skid plate. But the best scenario would just be a complete chassis made differently, maybe thicker with less cutouts.
Might be cool to make front and rears with bumpers???
 

Create an account or login to comment

You must be a member in order to leave a comment

Create account

Create an account on our community. It's easy!

Log in

Already have an account? Log in here.

Members online

No members online now.

Latest posts

Top